Custom Field Set Up
With custom fields, you can collect and store specific types of data for candidates and positions. You can choose from the following field types: Text, Date, Currency, Attachment, Dropdown, Radio Buttons.
Accessing Custom Field Set Up
- Click the gear ⚙️ in the left sidebar.
- Hover over Recruiting Preferences.
- Click Custom Fields.
Editing, Deleting or Moving Existing Custom Fields
- To edit a custom field, click the edit button
 next to the appropriate custom field.
 - To delete a custom field, click the X next to the appropriate custom field.
- To move the location of a custom field within a folder, click the move button
 next to the appropriate field and drag to the desired location.
Creating Custom Fields for Candidates
Custom fields can help you save specific details about candidates. Only hiring managers can add information to the custom fields on a candidate's profile.
To create a custom candidate field:
- On the Custom Fields page, scroll to Candidate Fields.
- Click + Custom Field.
- Enter a name for the field.
- Choose a data type.
- If you would like the data in the field to be encrypted, toggle to Yes in the Encrypt field. Note that file attachments can't be encrypted.
- If you would like the custom field to be enabled for use in email and SMS templates, toggle to Yes in the Allow in Templates field.
- To store the custom field in a specific folder, select an option in the Folder field. See Creating a Folder for Candidate Custom Fields for information on adding folders.
- Click Save Changes.
Restricting Access to Candidate Custom Fields
In some cases, you may want to restrict access to candidate custom fields that are sensitive in nature, such as salary requirements or offer information. You can hide these fields by placing them in restricted custom field folders. These are folders that are assigned to specific roles. Any user who does not have the assigned role will not be able to see the fields in that folder. Custom fields that are not located in a restricted folder can be accessed by the entire hiring team.
For information about restricting candidate custom field folders, please see Creating a Folder for Candidate Custom Fields.
Create Custom Fields for Positions
Custom fields can help you save and share specific details about positions. If enabled, custom fields are available when you create new positions. You can see and edit the data in custom fields in a position's settings.
Note: Position custom fields are only visible to hiring managers assigned to the position.
To create a custom position field:
- On the Custom Fields page, scroll to Position Fields.
- Click +Custom Field.
- Enter a name for the field.
- Choose a data type.
- Choose if the field should be Required, Optional, or Disabled.
- If you would like the custom field to be enabled for use in email and SMS templates, toggle to Yes in the Allow in Templates field.
- To store the custom field in a specific folder, select an option in the Folder field. See Creating a Folder for Position Custom Fields for information on adding folders.
- Click Save Changes.
Creating a Folder for Candidate Custom Fields
Administrators can create folders to group custom fields based on types of data collected or stored.
To create a folder:
- On the Custom Fields page, scroll to Candidate Fields.
- Click +Folder.
- Enter a name for the folder.
- To restrict access to the fields that will be placed in the folder:
- Click the +Add Position Roles button.

- A list of the position roles displays. Click the check box for each role that should be able to access the fields in the folder. Fields in restricted folders will display on the candidate's details page only if the user has an approved role on the position the candidate has applied to. Also, fields that are in restricted access folders will not be available as a column in the candidate tables.
- Click Save.
- Add a custom field to the folder by doing one of the following:
- Drag and drop an existing custom field into the folder.
- Select the folder name from the drop-down field.
Creating a Folder for Position Custom Fields
Administrators can create folders to group custom fields based on types of data collected or stored.
To create a folder:
- On the Custom Fields page, scroll to Position Fields.
- Click +Folder.
- Enter a name for the folder.
- Click Save.
- Add a custom field to the folder by doing one of the following:
- Drag and drop an existing custom field into the folder.
- Select the folder name from the drop-down field.
Custom Fields Mapping for Positions
Custom field mapping provides the ability to link position custom fields to each other so that selecting a value in a parent field will limit the available child fields to pre-configured values. A common example would be mapping a Country drop-down field to a State/Province drop-down field. When a selection is made in the Country field, the State/Province field will automatically be populated with only values that are appropriate for the selected country. Custom field mapping can be used to fill in vital position data quickly and efficiently, ensuring data is entered in a consistent manner.
Mapping Custom Fields
In this example, we will map the Job Code custom field to the Salary Grade, Minimum Salary and Maximum Salary custom fields. This allows us to limit the available salary grade options based on the job code and define a minimum and maximum salary within that salary grade.
- Click the gear ⚙️ in the left sidebar.
- Hover over Recruiting Preferences and select Custom Field Mapping. The Custom Field Mapping page displays. Additional information about this box
- Any existing parent/child mappings are listed on the page. The parent field is displayed with the number of child fields mapped to it.
- Existing parent/child mappings can be edited. Click the edit button
 in the Actions column to open a mapping for editing. Please see Editing Mapped Fields for additional information.
 - Existing parent/child mappings can be deleted. Click the delete button X in the Actions column to delete a mapping. Important: If you delete a mapping for a custom field that has already been used in a position, the selected values on the position do not change. However, because the mapping/link between the fields is no longer active, all available values for the parent field will be included in the options for a drop-down field.
- To create a new mapping, click the +Mapping button.
- In the Parent Field, choose a custom field for mapping. For this example, we have selected Job Code.
- In the Child Field, choose the custom fields from the available options. In this example, we will map the Salary Grade, Minimum Salary and Maximum Salary fields. Click the +Mapping button that displays and select the child field. Repeat this process for each child field.
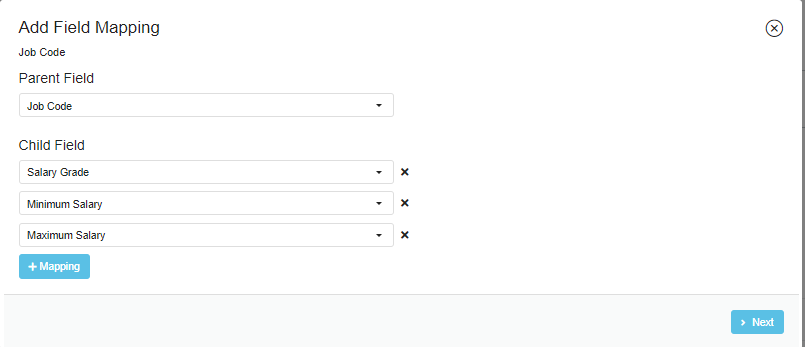
- Click Next. On the following page, the parent field values display in the Parent Options column.
- You can browse the options or use the Find an Option field to search for a specific value. When you have located the appropriate option, click it. The Child Text Fields and Child Dropdown Fields display on the right.
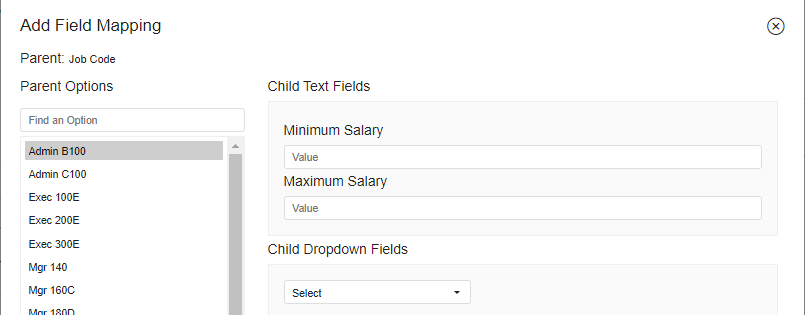
- Enter values in the child text fields as appropriate. In this example we will enter a minimum salary of $40,000 and a maximum salary of $50,000.
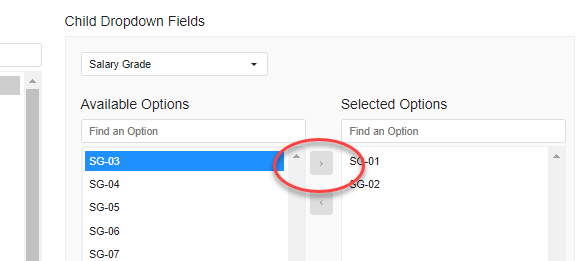
- To map drop-down child fields, select the appropriate field. In this example we will select Salary Grade. When selected, the custom field values display in the Available Options column. You can browse the values or use the Find an Option field to search for a specific value. In this example, we will select salary grades SG-01 and SG-02.
- Next, select the Child field options to map to the Parent field option. Select the appropriate child field from the drop-down field and the options for that field will display in the Available Options column.
- Map the appropriate child field options. In this example, we will map salary grades to the selected job code Admin B100.
- Click the child field value. Use Shift+ Click or Ctrl + Click command to select multiple values.
- Click the right arrow to move the values to the Selected Options column.
- Click Save Changes.
User View
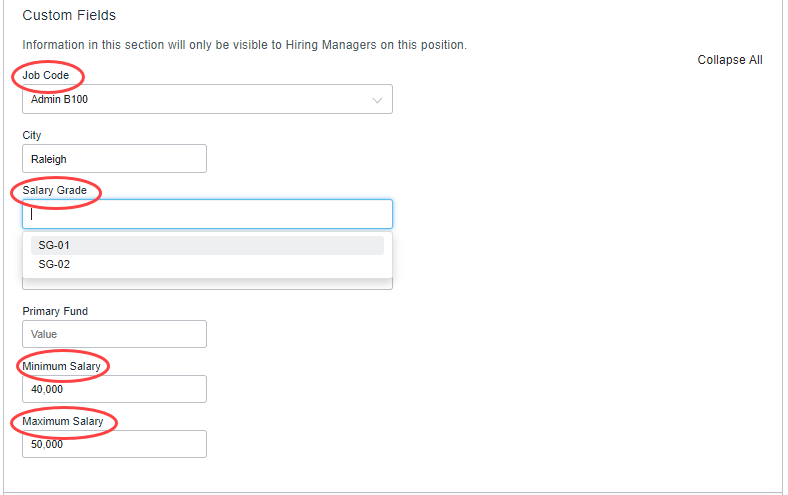
When specific child field options have been mapped to a parent field option, only those child field values will be available when the parent option is chosen. In the example below, the user has selected Admin B100 as in the Job Code field. Therefore, SG-01 and SG-02 are the only available options in the Salary Grade field. The minimum salary defaults to $40,000 and the maximum salary defaults to $50,000.
Editing Mapped Fields
Child fields can be added or removed. If a mapping has already been used in a position, this will not change the existing values, only limit or default the values that are available when the mapping is used going forward.
- Access the Custom Field Mapping page and click the Edit
 button for the mapping you are updating.
 - Click the mapped value in the Parent field and click the Edit Mapping button.
- To remove a child field mapping click the X to the right of the child field name. To add a mapping, click the +Mapping button and select the appropriate child field.
- Click the Back button to return to the Custom Field Mapping page.
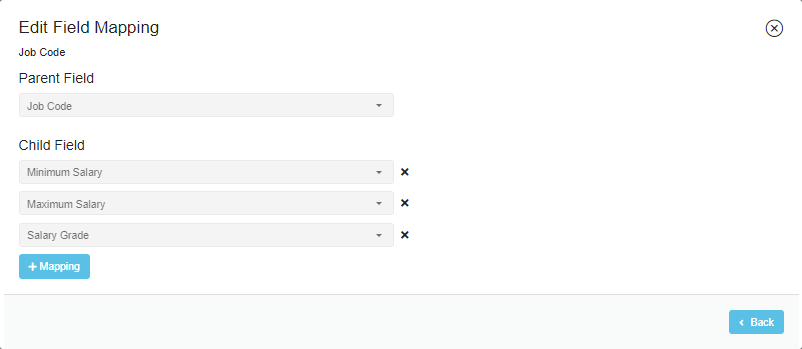
- You will need to select the parent field value again to display the child mappings. If you have added a child field, configure that field following the instructions in Mapping Custom Fields above.
Changes to Drop-down Custom Field Values
At some point, changes might be made to drop-down custom field options. Values can be added, deleted and renamed. When this is the case, the following behavior is applied when the field is being used in a custom field mapping:
- If an option is renamed, the value will not change for any positions that are already using the custom field mapping. However, you can edit the position and re-select the option to display the updated value.
- Likewise, if you delete an option, the value will not change for any positions that are already using the custom field mapping. However, if you edit the position, the deleted value will no longer be available.
- If you add a new option, you can apply that value to a mapped custom field on a position by editing the position.
